To enter a new estimate:
1. Select the Add New Claim option from the menu bar. The Set Status screen displays.
2. Click the Assignment radio button (if not already selected).
3. Click Add. The New Claim Form displays.
4. Enter as much claim information as possible. Fields displayed in Red are required fields and must be entered. To move from field to field, press the Tab key.
· Send Assignment Arrival Notification – this field is only used by a Claim Center Dispatcher to create a new assignment. All other users should leave this checkbox blank (unchecked).
· Created Date – defaults to today’s date; this field cannot be changed.
· First Name – enter the customer first name (required field).
· Last Name – enter the customer last name (required field).
· Phone and Address information – enter as much of the customer contact information as possible. The State may be selected from the drop-down list, or you can simply type the first letter of the state to have the first state with that letter appear.
· Customer Type – select a customer type (Claimant, Insured, No Insurance) from the drop-down list.
· Shop/Independent – select a Shop or Independent Adjustor from the drop-down list (required field).
· Estimator – select an estimator from the drop-down list (required field).
· Tech – You do not need to select a technician when entering a new estimate.
· File Handler - select a File Handler from the drop-down list.
· Internal Claim Handler – select the Internal Claim Handler from the drop-down list.
· Audit Claim – if this is an audited claim, click the checkbox.
NOTE: The selected Estimator and File Handler will be the recipients of all estimate email.
· Claim Type – select a claim type from the drop-down list (required field).
· Loss Type – select a loss type from the drop-down list (required field).
· Year – select the vehicle model year from the drop-down list (required field).
· Make – select the vehicle model from the drop-down list (required field).
· Model – enter the vehicle model type (required field).
· Mileage In, License Number, Color – complete the vehicle information as possible.
· Insurance Company – select an insurance company from the drop-down list (required field).
· Inside Adjuster – select the inside adjuster from the drop-down list (required field). To make this selection the default selection, click the Set Default checkbox.
· Outside Adjuster - select the outside adjuster from the drop-down list. To make this selection the default selection, click the Set Default checkbox.
· Policy # - enter a policy number as applicable.
· Claim # - enter the applicable claim number (required field).
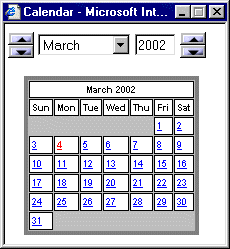
· Date of Loss - click the C button to display a popup calendar. To change the month or year, click the Up or Down arrow. To choose a date, click on it. The selected date is automatically entered.
·
Total Loss – select Yes or No from the drop-down list. For more information, refer to the Total Loss topic.
· Deductible – enter the customer’s deductible, for example, 500. Do not use a dollar sign (required field).
· Driveable – click No or Yes.
· Insured in Rental Car – if the customer’s insurance covers a rental car, click Yes, if not, click No, or if the customer does not know, click Unknown.
NOTE: The Inside Adjuster and Outside Adjuster selected in the Claim Information option will be the recipient of email sent to the Insurance Company.
5. Click Update to Wizard.
NOTE: The Update Only option is used when updating estimate information on the New Claim Form only and not if you want to attach digital images or specify depreciation/delivery items.